

Growing Bitter Gourd might seem intimidating, but trust me, with a few clever tricks and a little DIY spirit, you can harvest this nutritious and unique vegetable right in your own backyard! Forget those bland, store-bought gourds – imagine the satisfaction of serving up a homegrown dish bursting with fresh, slightly bitter flavor.
Bitter gourd, also known as bitter melon or karela, has a rich history, deeply rooted in Asian and African cultures. For centuries, it’s been prized not only for its distinctive taste but also for its impressive health benefits. From traditional medicine to culinary delights, this humble vegetable has played a significant role in various societies.
But why should you bother with growing bitter gourd? Well, for starters, it’s a fantastic way to add variety to your diet and enjoy the freshest possible produce. Plus, let’s be honest, there’s something incredibly rewarding about nurturing a plant from seed to harvest. Many people struggle with getting a good yield or dealing with common pests and diseases when growing bitter gourd. That’s where these DIY tricks come in! I’m going to share some simple, effective hacks that will help you overcome these challenges and enjoy a bountiful harvest. Get ready to roll up your sleeves and transform your garden into a bitter gourd paradise!
DIY: Growing Bitter Gourd Like a Pro (Even if You’re a Beginner!)
Okay, so you want to grow bitter gourd? Awesome! It might sound intimidating, but trust me, it’s totally doable, even if you don’t have a green thumb. I’m going to walk you through everything you need to know, from choosing the right variety to harvesting your own bounty of bitter goodness. Let’s get started!
Choosing Your Bitter Gourd Variety
First things first, let’s talk about varieties. There are a few different types of bitter gourd, and choosing the right one for your climate and taste is important.
* Chinese Bitter Gourd: These are usually longer and lighter green, with smoother skin. They tend to be less bitter than other varieties.
* Indian Bitter Gourd: These are smaller, darker green, and have a more bumpy, ridged skin. They’re known for their intense bitterness.
* Hybrid Varieties: These are often bred for disease resistance and higher yields. They can vary in size, shape, and bitterness.
I personally prefer the Chinese variety because it’s a bit milder, but if you’re a true bitter gourd aficionado, go for the Indian type! Check your local nursery or online seed suppliers to see what’s available in your area.
Getting Started: Seeds vs. Seedlings
You have two options here: starting from seeds or buying seedlings.
* Seeds: Starting from seeds is cheaper, but it takes longer. You’ll need to start them indoors a few weeks before the last frost.
* Seedlings: Buying seedlings is faster and easier, but it’s more expensive. Just make sure the seedlings look healthy and vigorous.
I usually start from seeds because I like the satisfaction of watching them sprout, but if you’re short on time, seedlings are the way to go.
Preparing Your Bitter Gourd Paradise
Bitter gourd needs a sunny spot with well-drained soil. Here’s how to get your garden ready:
* Sunlight: Bitter gourd needs at least 6-8 hours of direct sunlight per day.
* Soil: The soil should be rich in organic matter and well-draining. Amend your soil with compost or aged manure before planting.
* Support: Bitter gourd is a vine, so it needs something to climb on. A trellis, fence, or even a sturdy bamboo structure will work.
Step-by-Step Planting Guide
Okay, let’s get our hands dirty! Here’s how to plant your bitter gourd, whether you’re starting from seeds or seedlings:
Starting from Seeds (Indoors)
1. Soak the Seeds: Soak the bitter gourd seeds in warm water for 24 hours before planting. This helps to soften the seed coat and improve germination.
2. Prepare Seed Trays or Pots: Fill seed trays or small pots with a good quality seed-starting mix.
3. Plant the Seeds: Plant the seeds about 1/2 inch deep in the soil.
4. Water Gently: Water the soil gently to moisten it, but don’t overwater.
5. Provide Warmth: Keep the seed trays or pots in a warm place (around 70-80°F). A heat mat can be helpful.
6. Wait for Germination: The seeds should germinate in about 7-14 days.
7. Provide Light: Once the seedlings emerge, move them to a sunny window or under grow lights.
8. Harden Off: Before transplanting the seedlings outdoors, you’ll need to “harden them off.” This means gradually exposing them to outdoor conditions over a period of about a week. Start by putting them outside for a few hours each day, increasing the time each day.
Planting Seedlings (Directly in the Garden)
1. Choose a Sunny Spot: Select a location in your garden that receives at least 6-8 hours of direct sunlight per day.
2. Prepare the Soil: Dig a hole that is slightly larger than the root ball of the seedling. Amend the soil with compost or aged manure.
3. Plant the Seedling: Gently remove the seedling from its container and place it in the hole. Make sure the top of the root ball is level with the surrounding soil.
4. Backfill the Hole: Fill the hole with soil and gently pat it down.
5. Water Thoroughly: Water the seedling thoroughly after planting.
6. Provide Support: Install a trellis, fence, or other support structure for the vine to climb on.
Caring for Your Bitter Gourd Plants
Once your bitter gourd plants are in the ground, here’s how to keep them happy and healthy:
* Watering: Water regularly, especially during hot, dry weather. Bitter gourd needs consistent moisture to thrive. Aim for deep watering a couple of times a week rather than shallow watering every day.
* Fertilizing: Fertilize your bitter gourd plants every few weeks with a balanced fertilizer. You can also use compost tea or fish emulsion.
* Weeding: Keep the area around your plants free of weeds. Weeds compete with your bitter gourd for nutrients and water.
* Pruning: Prune your bitter gourd plants to encourage branching and fruit production. Remove any dead or yellowing leaves. You can also pinch off the tips of the vines to encourage side shoots.
* Pest Control: Keep an eye out for pests like aphids, spider mites, and squash bugs. Treat infestations promptly with insecticidal soap or neem oil.
* Pollination: Bitter gourd flowers are usually pollinated by insects, but if you’re not seeing a lot of fruit set, you may need to hand-pollinate. To hand-pollinate, use a small paintbrush to transfer pollen from the male flowers to the female flowers. You can identify female flowers by the small fruit that is already forming behind the flower.
Dealing with Common Problems
Even with the best care, you might encounter some problems. Here’s how to handle them:
* Yellowing Leaves: This could be a sign of overwatering, underwatering, or nutrient deficiency. Check the soil moisture and adjust your watering accordingly. Fertilize your plants if necessary.
* Lack of Fruit: This could be due to poor pollination, lack of sunlight, or nutrient deficiency. Try hand-pollinating your plants, make sure they’re getting enough sunlight, and fertilize them regularly.
* Pest Infestations: Treat pest infestations promptly with insecticidal soap or neem oil.
* Diseases: Bitter gourd can be susceptible to diseases like powdery mildew and downy mildew. Prevent these diseases by providing good air circulation and avoiding overhead watering. If you see signs of disease, treat your plants with a fungicide.
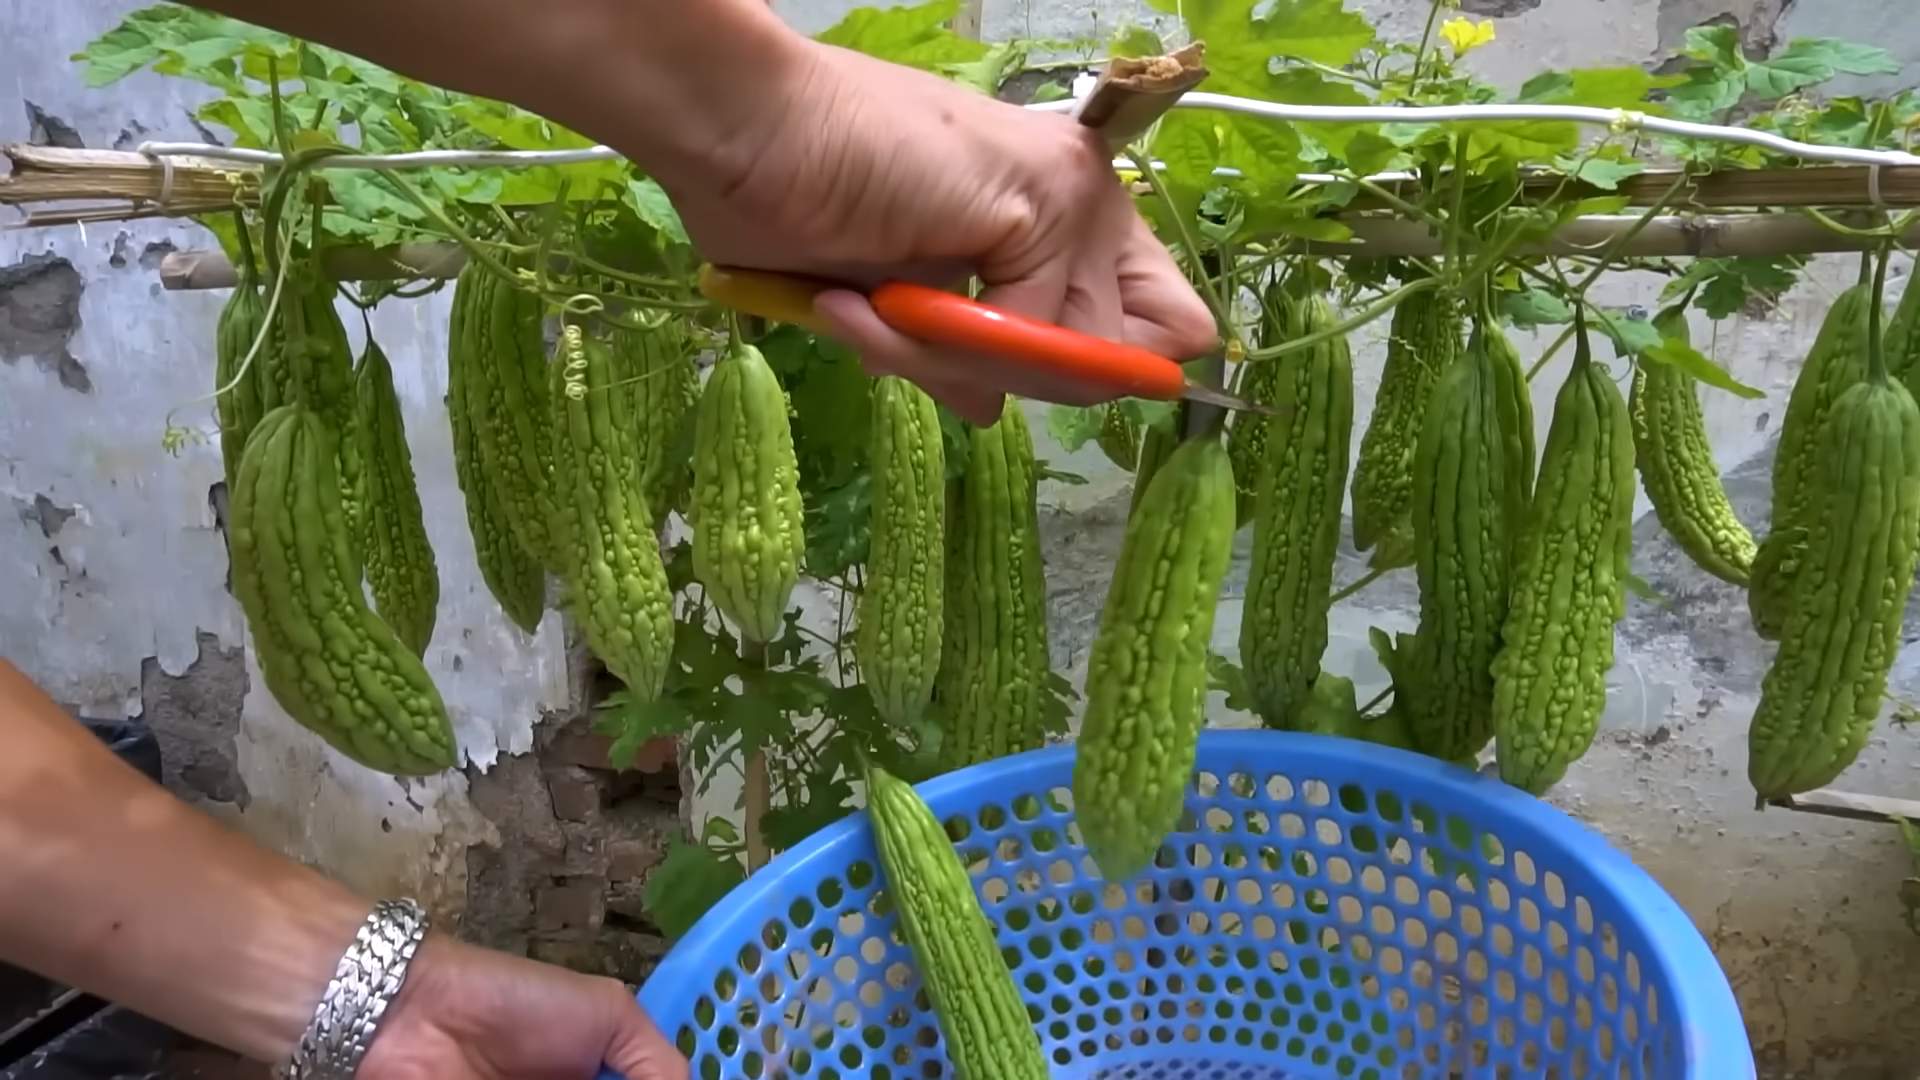
Harvesting Your Bitter Gourd
The moment you’ve been waiting for! Here’s how to harvest your bitter gourd:
* Timing: Harvest your bitter gourd when it’s still green and firm. The size will depend on the variety, but generally, you want to harvest them before they turn yellow or orange.
* Method: Use a sharp knife or pruners to cut the bitter gourd from the vine.
* Storage: Store your bitter gourd in the refrigerator for up to a week.
Enjoying Your Harvest
Now for the best part: eating your homegrown bitter gourd!
* Preparation: Bitter gourd is, well, bitter! To reduce the bitterness, you can soak it in salt water for about 30 minutes before cooking. You can also remove the seeds and pith, which are the most bitter parts.
* Cooking: Bitter gourd can be stir-fried, stuffed, curried, or even juiced. There are tons of recipes online, so experiment and find your favorite!
Extra Tips for Bitter Gourd Success
* Succession Planting: Plant new bitter gourd seeds or seedlings every few weeks to extend your harvest season.
* Companion Planting: Plant bitter gourd with companion plants like basil, marigolds, and nasturtiums to deter pests and attract pollinators.
* Mulching: Mulch around your bitter gourd plants to help retain moisture, suppress weeds, and regulate soil temperature.
* Record Keeping: Keep a garden journal to track your progress and learn from your mistakes. This will help you become a better bitter gourd grower over time.
Growing bitter gourd can be a rewarding experience. Don’t be afraid to experiment and learn as you go. With a little patience and effort, you’ll be enjoying your own homegrown bitter gourd in no time! Happy gardening!
Conclusion
So, there you have it – a comprehensive guide to successfully growing bitter gourd at home! We’ve explored everything from seed selection and soil preparation to trellising and pest control. But why should you embark on this slightly challenging, yet incredibly rewarding, gardening adventure? The answer lies in the unparalleled freshness, flavor, and health benefits that homegrown bitter gourd offers.
Store-bought bitter gourd often lacks the vibrant bitterness and crisp texture of its freshly harvested counterpart. By growing your own, you gain complete control over the growing process, ensuring that your bitter gourd is free from harmful pesticides and herbicides. You can harvest it at its peak ripeness, maximizing its nutritional value and unlocking its full potential in your culinary creations.
Beyond the superior quality, growing bitter gourd is also a deeply satisfying experience. Witnessing the transformation from a tiny seed to a sprawling vine laden with fruit is a testament to the power of nature and your own gardening skills. It’s a chance to connect with the earth, learn about plant life cycles, and appreciate the bounty that your garden provides.
But the benefits don’t stop there. Growing your own bitter gourd allows you to experiment with different varieties, each with its unique flavor profile and appearance. Consider trying the Chinese bitter gourd, known for its smoother skin and milder bitterness, or the Indian bitter gourd, characterized by its pointed ends and more intense flavor. You can also explore different trellising methods, from simple bamboo structures to elaborate archways, adding a touch of beauty and functionality to your garden.
And speaking of variations, don’t limit yourself to just growing bitter gourd for culinary purposes. The plant’s attractive foliage and delicate yellow flowers can also add visual interest to your garden. You can even use the dried vines as decorative elements in your home.
This DIY trick of growing bitter gourd is more than just a gardening project; it’s an investment in your health, your well-being, and your connection to nature. It’s a chance to experience the joy of harvesting your own food, knowing that you’ve nurtured it from seed to table.
We encourage you to take the plunge and try growing bitter gourd at home. Don’t be intimidated by the challenges; with a little patience, dedication, and the guidance provided in this article, you’ll be well on your way to enjoying a bountiful harvest of this nutritious and delicious vegetable.
Once you’ve successfully grown your own bitter gourd, we’d love to hear about your experience! Share your tips, tricks, and photos on social media using #HomegrownBitterGourd. Let’s create a community of passionate gardeners who are dedicated to growing their own food and sharing the joys of the harvest. We are confident that you will find that growing bitter gourd is a rewarding experience.
Frequently Asked Questions (FAQ)
What is the best time of year to plant bitter gourd?
The ideal time to plant bitter gourd is during the late spring or early summer, after the last frost has passed and the soil has warmed up to at least 65°F (18°C). Bitter gourd thrives in warm weather and requires a long growing season of at least 90-120 days. In warmer climates, you can also plant a second crop in the late summer for a fall harvest. However, be mindful of potential frost dates, as bitter gourd is sensitive to cold temperatures.
How much sunlight does bitter gourd need?
Bitter gourd requires at least 6-8 hours of direct sunlight per day to thrive. Choose a planting location that receives ample sunlight throughout the day. If you live in a particularly hot climate, some afternoon shade may be beneficial to prevent the leaves from scorching. Insufficient sunlight can lead to stunted growth, reduced fruit production, and increased susceptibility to pests and diseases.
What type of soil is best for growing bitter gourd?
Bitter gourd prefers well-drained, fertile soil that is rich in organic matter. The ideal soil pH is between 6.0 and 7.0. Before planting, amend the soil with compost, aged manure, or other organic materials to improve its drainage, fertility, and water-holding capacity. Avoid planting bitter gourd in heavy clay soil, as it can become waterlogged and inhibit root growth. If you have clay soil, consider amending it with sand and organic matter to improve its drainage.
How often should I water bitter gourd?
Bitter gourd requires consistent watering, especially during hot and dry weather. Water deeply and regularly, ensuring that the soil remains moist but not waterlogged. Avoid overhead watering, as it can promote fungal diseases. Instead, water at the base of the plant, using a soaker hose or drip irrigation system. The frequency of watering will depend on the weather conditions and the type of soil. As a general rule, water when the top inch of soil feels dry to the touch.
How do I fertilize bitter gourd?
Bitter gourd is a heavy feeder and requires regular fertilization to support its vigorous growth and fruit production. Start by incorporating a slow-release fertilizer into the soil at planting time. Then, side-dress the plants with a nitrogen-rich fertilizer every 2-3 weeks during the growing season. You can also use a balanced liquid fertilizer, diluted according to the manufacturer’s instructions. Avoid over-fertilizing, as it can lead to excessive vegetative growth and reduced fruit production.
What are some common pests and diseases that affect bitter gourd?
Bitter gourd is susceptible to a variety of pests and diseases, including aphids, spider mites, squash bugs, powdery mildew, and downy mildew. Regularly inspect your plants for signs of infestation or disease. If you detect any problems, take action immediately to prevent them from spreading. You can use organic pest control methods, such as insecticidal soap, neem oil, or diatomaceous earth, to control pests. For fungal diseases, use a copper-based fungicide or a biofungicide.
How do I harvest bitter gourd?
Bitter gourd is typically harvested when it is still green and slightly immature. The fruit should be firm to the touch and have a glossy skin. Use a sharp knife or pruning shears to cut the fruit from the vine, leaving a short stem attached. Avoid harvesting overripe fruit, as it will become bitter and less palatable. The harvesting time depends on the variety and growing conditions. Generally, bitter gourd is ready for harvest about 90-120 days after planting.
How do I store bitter gourd?
Freshly harvested bitter gourd can be stored in the refrigerator for up to a week. Wrap the fruit in a paper towel and place it in a plastic bag to prevent it from drying out. You can also freeze bitter gourd for longer storage. Blanch the fruit in boiling water for 2-3 minutes, then cool it in ice water. Drain the fruit and pack it into freezer bags or containers. Frozen bitter gourd can be stored for up to 6 months.
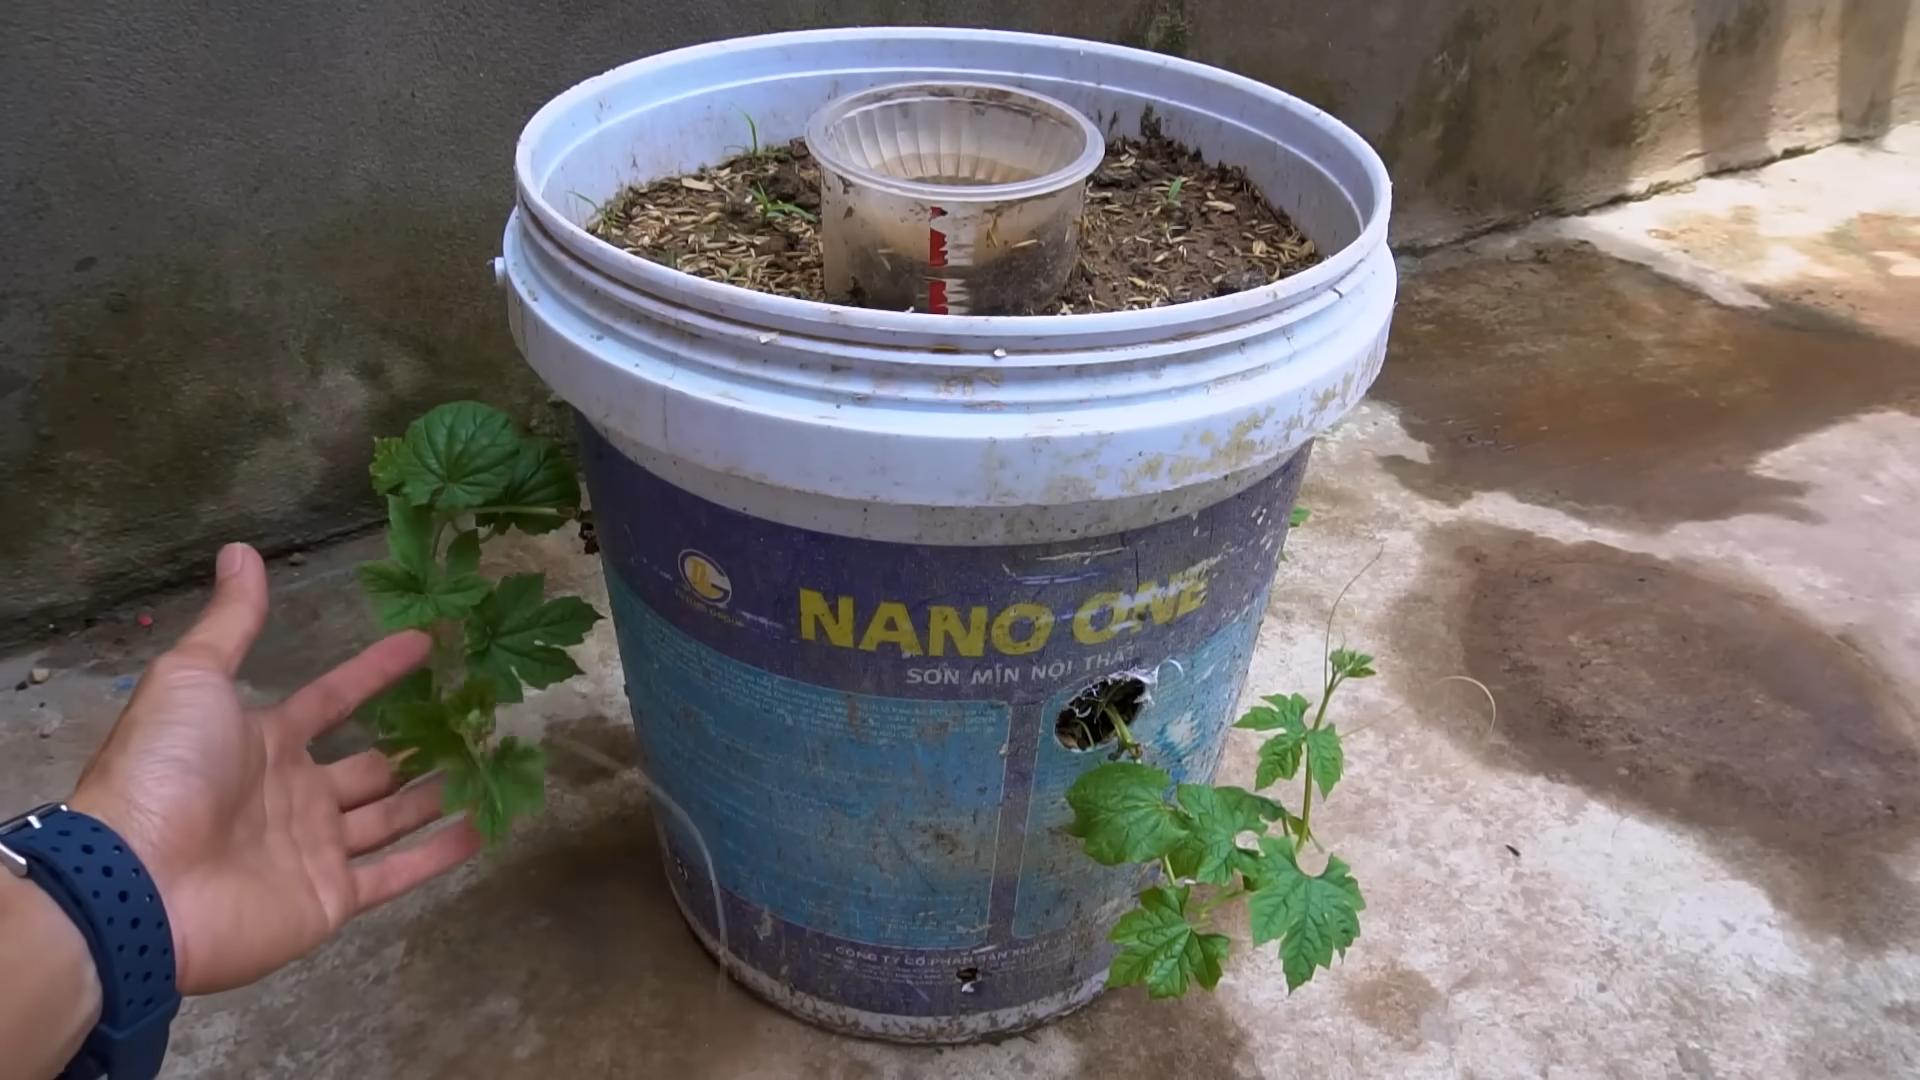
Can I grow bitter gourd in containers?
Yes, bitter gourd can be successfully grown in containers, provided that you choose a large enough container and provide adequate support for the vines. Select a container that is at least 18 inches in diameter and 18 inches deep. Fill the container with a well-draining potting mix that is rich in organic matter. Provide a trellis or other support structure for the vines to climb on. Water and fertilize the plants regularly, and ensure that they receive at least 6-8 hours of direct sunlight per day.
Is bitter gourd good for my health?
Yes, bitter gourd is a highly nutritious vegetable that offers a wide range of health benefits. It is rich in vitamins, minerals, and antioxidants. Bitter gourd has been shown to help regulate blood sugar levels, lower cholesterol, boost the immune system, and improve digestion. It is also a good source of fiber, which can help promote satiety and weight loss. While bitter gourd has many health benefits, it is important to consult with your doctor before consuming it if you have any underlying health conditions or are taking any medications.

Leave a Comment