

Grow Sponge Gourd Backyard: Imagine stepping into your backyard and harvesting fresh, vibrant sponge gourds, ready to be transformed into delicious meals or even natural sponges! It’s more attainable than you think, and this DIY guide is your key to unlocking the secrets of cultivating this fascinating vegetable right in your own outdoor space.
The sponge gourd, also known as luffa, has a rich history, deeply rooted in Asian and African cultures. For centuries, it’s been valued not only as a nutritious food source but also for its versatile fibrous skeleton, used for everything from bath sponges to scrubbing tools. I’ve always been fascinated by its dual purpose!
In today’s world, where sustainability and self-sufficiency are increasingly important, learning to grow sponge gourd backyard is more relevant than ever. Think about it: reducing your reliance on store-bought produce, minimizing your environmental footprint, and enjoying the satisfaction of nurturing something from seed to harvest. Plus, who wouldn’t want a constant supply of natural sponges? This DIY article will provide you with simple, effective tricks and hacks to ensure a bountiful harvest, even if you’re a beginner gardener. Let’s get started and transform your backyard into a thriving sponge gourd haven!
Growing Sponge Gourd in Your Backyard: A Comprehensive DIY Guide
Hey there, fellow gardening enthusiasts! I’m so excited to share my experience and guide you through growing your very own sponge gourds right in your backyard. It’s a rewarding process, and nothing beats the taste (and usefulness!) of homegrown produce. Let’s dive in!
Choosing the Right Variety and Location
Before we get our hands dirty, let’s talk about picking the perfect sponge gourd variety and finding the ideal spot in your yard.
* Variety Selection: There are a few different types of sponge gourds, also known as loofah gourds. Some are smoother, some are more ribbed, and some are better suited for eating when young. I personally prefer the smooth variety (Luffa aegyptiaca) for both sponge production and its mild flavor when harvested young. Do some research and see which variety appeals most to you!
* Sunlight is Key: Sponge gourds are sun-worshippers! They need at least 6-8 hours of direct sunlight each day to thrive. Choose a location in your yard that gets plenty of sunshine.
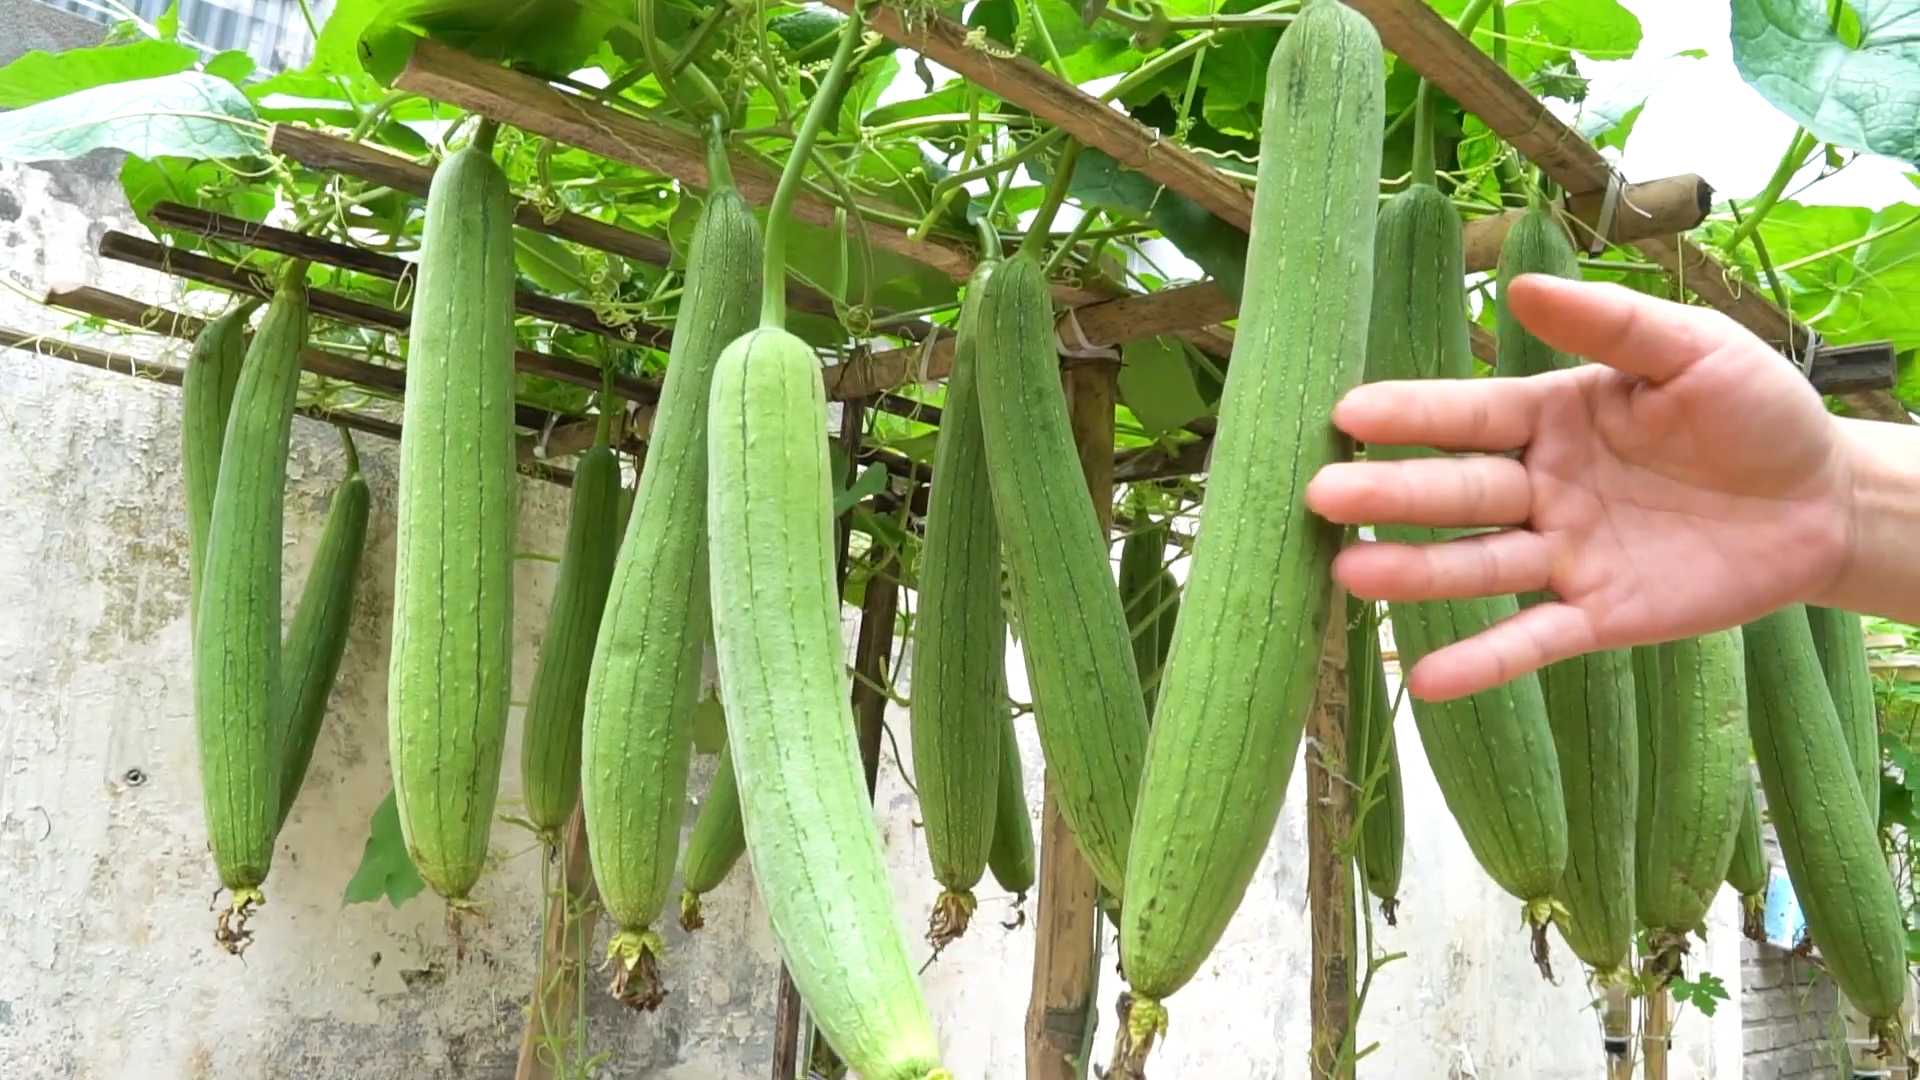
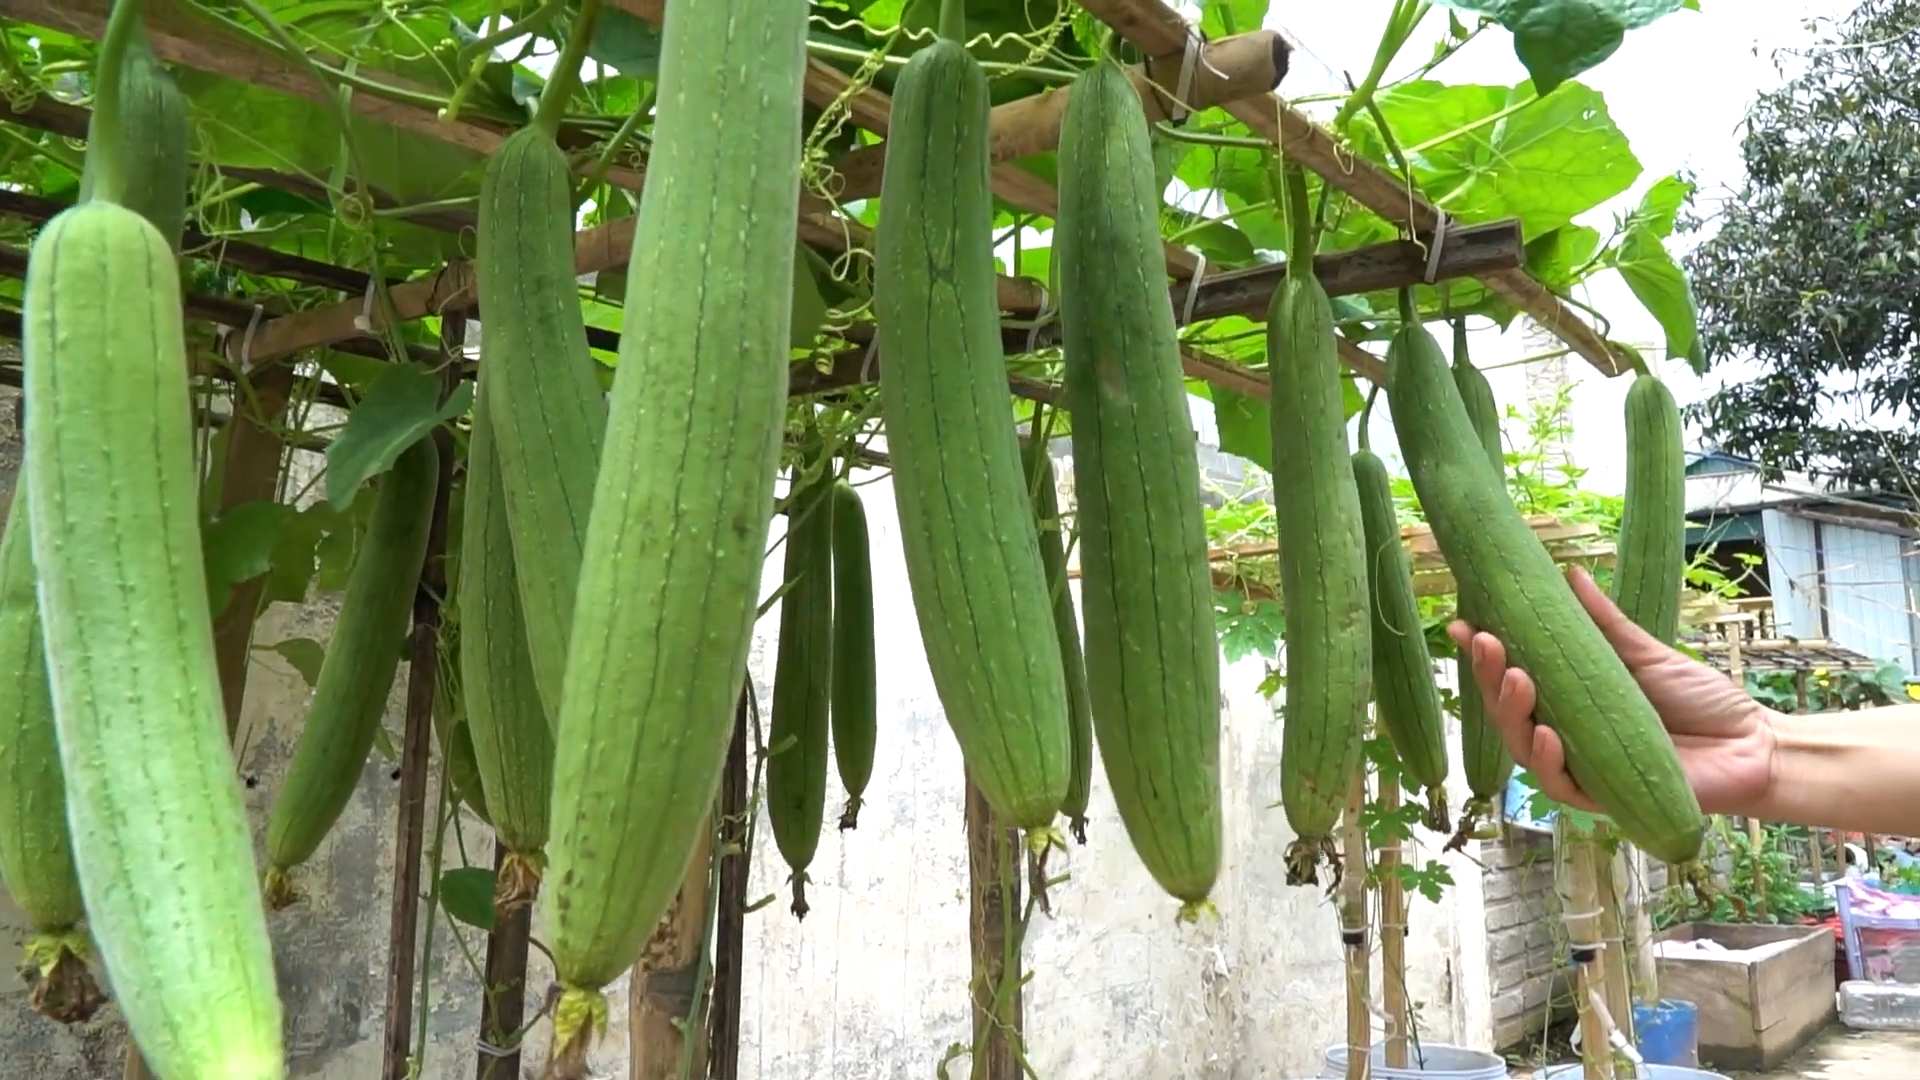
* Space Requirements: These gourds are climbers, and they can get BIG! They need a sturdy trellis or fence to climb on. Make sure you have enough space for them to spread out. I’ve seen them reach 15-20 feet in length, so plan accordingly.
* Soil Matters: Sponge gourds prefer well-drained, fertile soil. Amend your soil with compost or well-rotted manure before planting to give them a good start.
Preparing the Soil and Setting Up the Trellis
Now that we’ve chosen our variety and location, let’s get the soil ready and set up the support system.
1. Soil Preparation:
* Clear the area of any weeds, rocks, or debris.
* Loosen the soil to a depth of at least 12 inches.
* Incorporate plenty of compost or well-rotted manure into the soil. This will provide essential nutrients and improve drainage. I usually add about 2-3 inches of compost and mix it in thoroughly.
* Rake the soil smooth and level.
2. Trellis Construction:
* Choose your trellis type: You can use a sturdy fence, a homemade trellis made of wood or bamboo, or even a metal cattle panel. The key is to make sure it’s strong enough to support the weight of the growing gourds.
* Build or install the trellis: If you’re building your own, make sure it’s at least 6-8 feet tall. Secure it firmly in the ground to prevent it from tipping over. I’ve used both wooden trellises and cattle panels with great success.
* Ensure adequate spacing: If you’re planting multiple sponge gourd plants, space them about 2-3 feet apart along the trellis. This will give them enough room to grow without overcrowding each other.
Starting Your Sponge Gourd Seeds
Sponge gourds have a long growing season, so it’s best to start the seeds indoors a few weeks before the last expected frost.
1. Soaking the Seeds:
* Soak the seeds in warm water for 24 hours before planting. This will help soften the seed coat and improve germination rates. I usually put them in a small bowl of water on a sunny windowsill.
2. Planting the Seeds Indoors:
* Fill small pots or seed trays with a good quality seed-starting mix.
* Plant the seeds about 1 inch deep.
* Water gently and keep the soil moist but not soggy.
* Place the pots in a warm location, such as on a heat mat or near a sunny window.
* Germination usually takes about 7-14 days.
3. Caring for Seedlings:
* Once the seedlings emerge, provide them with plenty of light. If you don’t have a sunny window, you can use grow lights.
* Water regularly, allowing the soil to dry out slightly between waterings.
* Fertilize the seedlings with a diluted liquid fertilizer every 2 weeks.
Transplanting Your Seedlings
Once the weather has warmed up and the risk of frost has passed, it’s time to transplant your seedlings into the garden.
1. Hardening Off:
* Before transplanting, you need to “harden off” the seedlings. This means gradually exposing them to outdoor conditions over a period of 7-10 days.
* Start by placing the seedlings outdoors in a sheltered location for a few hours each day, gradually increasing the amount of time they spend outside.
* This will help them adjust to the sun, wind, and temperature changes.
2. Transplanting:
* Choose a cloudy day to transplant your seedlings. This will help prevent them from getting stressed by the sun.
* Dig a hole that is slightly larger than the root ball of the seedling.
* Gently remove the seedling from the pot and place it in the hole.
* Backfill the hole with soil and water thoroughly.
* Space the plants 2-3 feet apart along the trellis.
Caring for Your Sponge Gourd Plants
Now that your sponge gourd plants are in the ground, it’s important to provide them with the care they need to thrive.
1. Watering:
* Sponge gourds need consistent watering, especially during hot, dry weather.
* Water deeply at the base of the plants, avoiding getting the leaves wet.
* Mulch around the plants to help retain moisture and suppress weeds.
2. Fertilizing:
* Fertilize your sponge gourd plants every 2-3 weeks with a balanced fertilizer.
* You can also use compost tea or fish emulsion to provide them with extra nutrients.
3. Pruning:
* Pruning can help improve air circulation and encourage fruit production.
* Remove any yellowing or dead leaves.
* You can also prune back the vines to control their growth.
4. Pest and Disease Control:
* Keep an eye out for pests such as squash bugs, aphids, and cucumber beetles.
* You can use insecticidal soap or neem oil to control these pests.
* Sponge gourds can also be susceptible to fungal diseases such as powdery mildew.
* Ensure good air circulation and avoid overhead watering to prevent these diseases. If you see signs of powdery mildew, treat the plants with a fungicide.
Harvesting Your Sponge Gourds
The moment we’ve all been waiting for! Harvesting your homegrown sponge gourds.
1. Harvesting for Eating:
* If you want to eat your sponge gourds, harvest them when they are young and tender, usually about 6-8 inches long.
* They should be firm and have a smooth skin.
* You can use them in stir-fries, soups, or stews.
2. Harvesting for Sponges:
* If you want to use your sponge gourds as sponges, let them mature on the vine until the skin turns brown and dry.
* The gourd will feel light and hollow.
* Harvest the gourds before the first frost.
Processing Your Sponge Gourds for Sponges
This is where the magic happens! Turning those dried gourds into usable sponges.
1. Removing the Skin and Seeds:
* Soak the dried gourds in water for a few days to soften the skin.
* Once the skin is soft, you can peel it off easily.
* Cut off the ends of the gourd and shake out the seeds. You can save these seeds for planting next year!
2. Cleaning the Sponge:
* Rinse the sponge thoroughly with water to remove any remaining pulp or seeds.
* You can use a brush to scrub the sponge clean.
* Soak the sponge in a solution of water and bleach (1 part bleach to 10 parts water) for about 30 minutes to disinfect it.
* Rinse the sponge thoroughly with water again.
3. Drying the Sponge:
* Hang the sponge to dry in a well-ventilated area.
* It may take several days for the sponge to dry completely.
* Once the sponge is dry, it’s ready to use!
Tips and Tricks for Success
Here are a few extra tips and tricks I’ve learned along the way to help you have a successful sponge gourd harvest:
* Pollination: Sponge gourds have separate male and female flowers. If you’re not seeing any gourds developing, you may need to hand-pollinate the flowers. Use a small paintbrush to transfer pollen from the
Conclusion
So, there you have it! Growing sponge gourd in your own backyard is not only achievable but also incredibly rewarding. From seed to scrub, you’re participating in a sustainable cycle, reducing waste, and enjoying the freshest possible produce. This DIY project is more than just a gardening endeavor; it’s a step towards self-sufficiency and a connection with nature.
Why is this a must-try? Because it’s a triple threat! First, you get delicious, tender sponge gourd for your culinary creations. Think stir-fries, soups, and even fritters – the possibilities are endless. Second, you gain access to natural, biodegradable sponges that are gentle on your skin and the environment. Say goodbye to synthetic sponges that leach chemicals and contribute to landfill waste. Third, you experience the sheer joy of nurturing a plant from seed to harvest, a truly fulfilling experience that connects you to the natural world.
But the fun doesn’t stop there! Feel free to experiment with different varieties of sponge gourd. Some produce longer, thinner gourds, while others are shorter and rounder. Each variety has a slightly different texture and flavor, so explore and find your favorite. You can also try different trellising methods. A sturdy archway covered in lush green vines makes a stunning garden feature. Or, if space is limited, consider growing your sponge gourd in a large container with a trellis attached.
Don’t be afraid to get creative with your sponge gourd sponges, too. Once harvested and dried, you can cut them into different shapes and sizes to suit your needs. Make small sponges for washing dishes, larger ones for scrubbing your body, or even extra-large ones for cleaning your car. You can even add essential oils to your sponges for a refreshing and aromatic cleaning experience. Lavender, tea tree, and eucalyptus are all great options.
Growing sponge gourd is a journey, and every garden is unique. You might encounter challenges along the way, but don’t let that discourage you. Remember to provide your plants with plenty of sunlight, water, and nutrients. Keep an eye out for pests and diseases, and take action promptly if you spot any problems. With a little patience and care, you’ll be rewarded with a bountiful harvest of sponge gourds.
We wholeheartedly encourage you to embark on this DIY adventure. Imagine the satisfaction of using a sponge that you grew yourself! It’s a conversation starter, a sustainable choice, and a testament to your gardening skills.
So, grab some seeds, prepare your soil, and get ready to grow your own sponge gourd. We’re confident that you’ll love the experience. And once you’ve harvested your first crop, be sure to share your photos and stories with us. We’d love to see your backyard sponge gourd gardens and hear about your favorite ways to use your homemade sponges. Let’s create a community of sponge gourd growers and inspire others to embrace this sustainable and rewarding DIY project. Happy gardening!
Frequently Asked Questions (FAQ)
What is sponge gourd and why should I grow it?
Sponge gourd (Luffa aegyptiaca or Luffa cylindrica) is a vine-grown vegetable that produces edible fruits when young and fibrous sponges when mature. Growing it offers several benefits: fresh produce, natural sponges, reduced waste, and a connection to nature. It’s a sustainable and rewarding DIY project.
How do I start growing sponge gourd?
You can start sponge gourd from seeds or seedlings. Seeds should be started indoors 6-8 weeks before the last expected frost. Soak the seeds in water for 24 hours before planting to improve germination. Plant seedlings outdoors after the last frost, ensuring they have a sturdy trellis to climb.
What are the ideal growing conditions for sponge gourd?
Sponge gourd thrives in warm climates with plenty of sunlight (at least 6-8 hours per day). It prefers well-drained soil rich in organic matter. Regular watering is essential, especially during hot and dry periods. The ideal soil pH is between 6.0 and 6.8.
How often should I water my sponge gourd plants?
Water deeply and regularly, especially during dry spells. Aim for at least 1 inch of water per week. Check the soil moisture regularly and water when the top inch feels dry. Avoid overwatering, as this can lead to root rot.
What kind of trellis should I use for sponge gourd?
Sponge gourd vines can grow quite long and heavy, so a sturdy trellis is essential. Options include wooden trellises, metal arches, fences, or even strong netting. Ensure the trellis is tall enough to accommodate the full growth of the vine, typically 6-15 feet.
How do I fertilize my sponge gourd plants?
Feed your sponge gourd plants regularly with a balanced fertilizer. Apply a slow-release fertilizer at planting time and then side-dress with a nitrogen-rich fertilizer every few weeks during the growing season. You can also use compost tea or other organic fertilizers.
When is the best time to harvest sponge gourds for eating?
Harvest sponge gourds for eating when they are young and tender, typically 6-8 inches long. The skin should be smooth and easily pierced with your fingernail. Overripe gourds will become fibrous and less palatable.
How do I harvest sponge gourds for sponges?
Allow the gourds to mature fully on the vine until the skin turns brown and hard. The gourd will feel light and dry. Harvest the gourds before the first frost.
How do I process sponge gourds into sponges?
After harvesting, soak the mature gourds in water for several days to soften the skin. Peel off the skin and remove the seeds and pulp. Rinse the sponge thoroughly and allow it to dry completely in a well-ventilated area. You can then cut the sponge into desired shapes and sizes.
How do I clean and maintain my sponge gourd sponges?
Rinse your sponge gourd sponges thoroughly after each use and allow them to air dry. You can also wash them in the washing machine on a gentle cycle. To disinfect your sponges, soak them in a solution of water and vinegar or baking soda. Replace your sponges every few weeks or months, depending on usage.
Are there any pests or diseases that affect sponge gourd?
Common pests include aphids, squash bugs, and vine borers. Diseases include powdery mildew and fungal infections. Monitor your plants regularly and take action promptly if you spot any problems. Organic pest control methods, such as insecticidal soap or neem oil, can be effective. Ensure good air circulation to prevent fungal diseases.
Can I grow sponge gourd in containers?
Yes, you can grow sponge gourd in containers, but you’ll need a large container (at least 20 gallons) and a sturdy trellis. Choose a well-draining potting mix and provide regular watering and fertilization. Container-grown plants may require more frequent watering than those grown in the ground.
How long does it take for sponge gourd to mature?
Sponge gourd typically takes 90-120 days to mature from seed to harvest. The exact time will depend on the variety, growing conditions, and climate.
What are some creative ways to use sponge gourd sponges?
Besides dishwashing and bathing, sponge gourd sponges can be used for exfoliating skin, cleaning cars, scrubbing floors, and even as natural pot scrubbers. You can also add essential oils for a refreshing and aromatic cleaning experience.
Where can I buy sponge gourd seeds?
Sponge gourd seeds are available at most garden centers, nurseries, and online seed retailers. Look for reputable suppliers to ensure you’re getting high-quality seeds.


Leave a Comment